
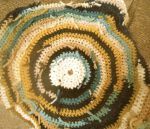
The cushion cover part 2…
As a follow up to Hurray for crochet…I have now finished both sides of my crocheted cushion cover-yay!
But the reverse sides looked like this

I think a spider/octopus/wooly legged thing may have attacked my cushion…
I half heartedly tried to find out the proper way of finishing it-but the book I read said something about threading each end onto a needle and weaving it in, and that all sounded far too much like hard work, so I went with this option

Tying the two ends together
I am sure this is very wrong. I will no doubt find out why when my cushion starts unravel, but it was quick and easy and seems ok for now! (Can anyone tell me what I should really have done, and why this is wrong if it is..?!)
So afterwards, it looked like this

Much better!
I was left with this

A lot of short pieces of wool
But panic not dear reader, this has not been thrown away (perish the thought!)-I have a cunning plan for it, and will re-visit it just when you least expect it…
The next thing needed was a cushion pad of the right shape and size-hmmmmm….
Not being able to go out and buy a 34cm diameter round cushion pad-I decided to fashion one myself.
And just in case you should ever need to, here is how:
- measure the diameter of your finished pieces. Be pleasantly surprised if they are both about the same size (!) – min were 34cm (ish)
- find some old material/sheet type stuff (in hindsight, this is probably awful stuff to make a cushion pad from as I think all the feathers will poke through..), and drew a circle. This sounds easy, but it is actually really quite technical. Not having a plate big enough, or a giant’s compass, I had to make one myself, and I was very chuffed at my ingenuity (so you should be too)
- get some string and tie a pen to one end, as low down the pen as possible. Then measure 18cm (34cm diameter of cushion pad required+2cm seam allowance, then divided by 2 to get the radius-I told you it was technical…) and put a pin at this point
- then I fold the fabric in half, and stick the pin in somewhere near the middle, and use your homemade compass to draw a circle. I know! How clever is that..?!

I know you are amazed at my genius…
- cut around the circles, pin together right sides facing, and sew around with a 1.5-2cm seam allowance, remembering to leave a gap for stuffing. Turn inside out (right way around)
- now, stuffing….What to use for stuffing? I did try and keep a bag of really tiny scraps and trimmings, which would have been perfect for this, but I think hubby must have found it at some point, and
thrown it awayrecycled it (shocked gasps). So I ventured up in to the loft and found a slightly manky looking leaky cushion pad…

picked open a gap in one of the seams and proceeded to get feathers everywhere attempting to transfer them into my new pad…

Can I blame the cats..?
Then slip stitch the opening shut pronto to avoid anymore feathers escaping. And you have made a customised cushion pad-yay!

Ta da!
Stay tuned for the next thrilling instalment, where you get to see the actual cushion cover, on the pad…
